Tuesday, March 25, 2014

Happy 2nd Birthday Caitlin!

Our little girl turned 2 a little over a week ago, on the 14th! I'm still in disbelief.  I actually sobbed several times the day of Caitlin's birthday because I just couldn't believe my little girl is 2 already.  If the first 2 years went by that quickly, I don't want to know how fast the rest of my life will pass.
I felt so out of control.
Me 2 years ago (March 10, 2012).  Wait, are you trying to tell me this photo wasn't taken yesterday?!

But enough about me.
Caitlin had 2 birthday celebrations to celebrate the big 2!
She had an intimate dinner and cake with the grandparents the Sunday before her birthday, and a pizza party playdate with Caitlin's little friends the Sunday after her birthday.

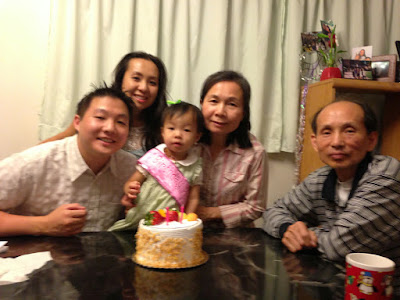
At the grandparents house, I brought over Thai food take-out and my sister brought over good ol' Kee Wah Bakery strawberry cake.  Lots of eating and hanging out, the way a birthday should be!

For Caitlin's party with her friends, I was initially reluctant to throw a party because I'm terrible at hosting parties.  I get all anxious at the thought of having to entertain a lot of people together at one time and figuring out the guest list is always a big point of stress for me too.  After some convincing from friends, I decided to throw a party, initially called a "glorified playdate".  But knowing me, if I do something, I gotta do it right! I had to throw the best 2-year-old party ever.  I needed to have good entertainment and good food!  We just recently fixed up our backyard so our yard was the perfect venue to host the playdate party.
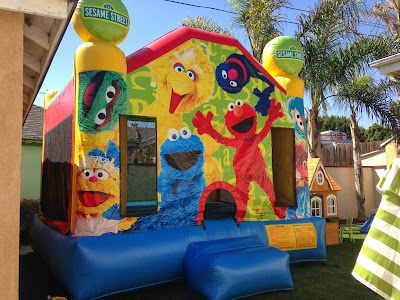
I rented a Sesame Street bouncy house (it was harder than I thought to find Sesame Street) for our "main attraction".  Caitlin's new playhouse and Cozy Coupe were also fun toys that kids could enjoy at her party.
I stopped by the local Dollar Tree and Party City and picked up all my party supplies: bubbles for party favors, party favor bags, table cloths, construction paper, and mylar balloons.  Party finger food was from Costco and Trader Joes (veggie sticks and dip, hummus, fruit salad, rice crackers, pretzels, potato chips, goldfish crackers, vegan "chicken" tenders, and butter noodles) and pizza was from Pamore's.  Drink selections (from costco) included bottled water, coca cola, Hansens soda, and Fruitables juice boxes (fruit and veggies in every box!).  I borrowed 2 tables from my sister.  Every thing else you saw at my party was stuff I already had around the house.
My good friend and I spent all of Saturday (the day before the party) making awesome Cookie Monster and Elmo cakes and cupcakes.  Everyone was impressed with our cakes.  We should really be bakers.  I tried to keep the Sesame Street theme tasteful and not too over the top.  I got a lot of ideas and inspiration from Pinterest.
The party was at 4pm on Sunday so I assigned Jeff the task of getting Caitlin out of the house Sunday morning so I could finish last minute party details and also to wear Caitlin out, to ensure that she takes a good long nap before the party.  Jeff took Caitlin to Noah's Ark at Skirball (which she loved, and ended up taking at 2.5 hour nap!), while I worked on the veggie platter, fruit salad, waited for the bouncy house delivery guy and picked up 9 mylar balloons.  My good friend arrived at 2pm to work on backyard buffet table set up and any other last minute details.  I assigned my sister to take pictures and bring serving spoons, and my brother in law the task of picking up pizza at 5:15pm.  It takes a village to make a glorified playdate party happen! hehe! 

Overall, I think the party went well. People were well fed, the turnout was great (about 40 people), kids were entertained, and Caitlin had the best day of her life.  I know Caitlin won't remember this day and has yet to understand the concept of birthdays, but I know that she had a great time and she knew that we did something very special for her.  That is good enough for me.

Birthday Cake with the Lin Grandparents


The cakes my good friend and I made. It took us 6 hours to frost them:
We had to make 2 extra trips to the store to get more food coloring and I was *this* close to giving up and buying grocery store sheet cake.  I'm glad we didn't.
I also made these cupcake tiers out of 3 different sized paper plates with a paper cup glued in between each plate.  Convenient and disposable!
From Caitlin's 2nd Birthday

Party Favors  I made these Elmo and Cookie Monster bags!
(homemade sesame street bubbles and Albertson's chocolate chip cookies in each bag):
From Caitlin's 2nd Birthday


the homemade sesame street bubbles that went in the party favor bags


Sesame Street Bouncy House
From Caitlin's 2nd Birthday

Cake and birthday song
From Caitlin's 2nd Birthday

The Good Lookin' Family!
From Caitlin's 2nd Birthday


View the entire album here:
Caitlin's 2nd Birthday


------------------
I will write up a 2nd-year Caitlin review blog post on our Raising A Family blog very soon!  Don't think I have forgotten!

Monday, March 10, 2014

Our backyard -- playthings for Caitlin

Just when I was all done writing about the improvements to our backyard, turns out, there is more!

During a trip to Costco to do some returns and pick up some bananas, we came across a kid playhouse and a kid bench on display.  Caitlin absolutely loved playing with the playhouse and even ended up locking out some other costco kids that wanted to play in it.  Solid cedar wood, fits 5 kids, even comes with a play kitchen, for $280... we knew we had to get it!
There was a matching toddler picnic bench for an additional $85 so we went ahead and got that too!

Yeah. that was probably the worst case of impulse buys ever.

It wasn't until we reached our Camry, with our recent purchases in tow, that we realized we couldn't drive everything home!  There is no way the playhouse would fit in the trunk...
I've had enough Ikea-furniture-buying experiences combined with more-hours-than-I'm-willing-to-admit Tetris experience that I was able to get all the pieces of the playhouse into the trunk, backseat, and front seat of the car.  Of course, that meant that Jeff had to drive home with the trunk slightly open and tied down with a rope.  And that also meant that Caitlin and I had no where to sit!  While Caitlin and I killed time in the local Albertsons, Jeff drove all the furniture home, unloaded everything into the driveway, then drove back and picked up me and mini me.

The playhouse had.. a ton of pieces..
The manual said that it will take 2 adults 8-10 hours to build.  We spent the following week building the playhouse.. a couple of hours at a time.  Some nights, we were were up until 1 am working on the playhouse.  We had a deadline to get it finished by the following weekend, because we had cousins coming over with their kids.  10 hours later, we got it done!
After that, Jeff and I put the bench together -- took less than 30 minutes.

Our yard looks playdate (and birthday party celebration) ready!!
 the playhouse's pieces.  Not picture are the itty bitty tiny pieces
 Daddy's little helper
the playhouse is complete!

building the bench!

Our yard looks absolutely amazing and kid friendly!
Caitlin's in this picture.  Can you help me find her?


---------------------
Ok, so this isn't related to the backyard, but it's related to the new playthings that Caitlin recently acquired.
I noticed that Caitlin has always had an interest in play kitchens but I have a hard time throwing down $90 on a play kitchen for her.  Especially when I think she will lose interest in a few weeks.
Instead, I collected some large cardboard boxes, covered then in contact paper, glued on some old milk caps, built cardboard some racks/shelves.. and VOILA! Caitlin has her very own cardboard kitchen.  All the supplies cost me under $5 since most things were things I already had around the house. 
I gotta admit.. I even impressed myself!
Caitlin absolutely loves this kitchen.  She totally ditches her Legos now, and would rather "cook" in her kitchen.


Friday, January 31, 2014

Dr Oz: 3-Day Detox Diet Smoothie Meal Plan recipes

Thanks to a friend, Jeff and I have been inspired to do a 3 day detox.  We've never done one before, so here's to new experiences.  And it never hurts to purge your body of toxins!  right?... right?? =/

I plan on following the Dr Oz: 3-Day Detox Diet Smoothie Meal Plan, as described here.  But that page doesn't actually tell you the recipe on how to make each drink (I think that's their scheme to get you to buy his book.).  So instead, I scoured the internet for the recipes (or ones that are similar enough), made a few tweaks to the recipes, and also followed some tips from my friend who did the detox already.
I'm super excited.
So I wanted to share with you right here, all the recipes I compiled for the detox drinks.  Also, so I have a place to reference back to later if I want to make the drinks again. =)


BREAKFAST:  Green Goodness Smoothie
  • 2 cups spinach
  • 1 -2 medium cucumber (approx 2 cups)
  • 1 stalk celery
  • 1/2 inch gingerroot (or 1 teaspoon)
  • 1 bunch chopped parsley (approx 1/2 cup chopped)
  • 2 apples, cored
  • 1 lime, juice of
  • 1/2 lemon, juice of
  • 4 ounces almond milk or water
Blend. makes 3 servings. Dr. Oz suggests adding other items at first to sweeten the green drink to your taste.


MIDMORNING SNACK:
Raw Almond Milk
  • 1 cup raw almonds
  • water for soaking nuts
  • 3 cups water
  • 1/2 tsp vanilla (optional)
Soak the almonds in water overnight or for at least 6 hours.Drain the water from the almonds and discard. Blend the 3 cups of water, almonds and dates until well blended and almost smooth. Strain the blended almond mixture using a cheesecloth or other strainer. Homemade raw almond milk will keep well in the refrigerator for three or four days.


LUNCH: Cranberry Apple Juice
Mix together 100% cranberry juice with 100% apple juice. 

 
AFTERNOON SNACK: Sweet Potato & Apple Smoothie
  • 2 peeled sweet potatoes boiled or baked
  • 2 cups unsweetened almond milk
  • handful of walnuts
  • 2 tsp cinnamon
  • 1 tsp vanilla extract
  • Blend  (makes 2 servings)
DINNER: Bravocado! Pear Avocado
  • 4–8 ounces cold water
  • 1⁄2 cup unsweetened coconut milk beverage (such as So Delicious)
  • 1⁄2 avocado, pit removed, flesh scooped
  • 1 pear, peeled and cored
  • Blend (makes 1 serving)
Evening Snack: Raw Walnut Milk
  • 1 cup walnut halves, rinsed (4 oz.)
  • water (about 3 cups)
  • 1 tablespoon honey (or agave nectar)
  • 1 teaspoon pure vanilla extract
1: Place walnuts in a medium bowl and fill with enough water to cover by 1 inch. Cover and set aside. Soak at room temperature at room temperature to soak at least 1 hour to 12 hours for easy blending.
2: Drain walnuts; rinse thoroughly. In a blender combine walnuts, 3 cups water, honey, vanilla, and salt; blend on low until very smooth, at least 2 minutes. Serve immediately or store in the refrigerator for up to 5 days.
  Yields 3.5 cups

Monday, January 20, 2014

Our backyard - back wall edition

Finally! I think we are finished with our backyard revamp.
After installing fake grass, mulching the palm trees, getting patio furniture, and building a succulent container garden, we did the last and final touches: repainted the far back wall of our backyard and covered up the hideous alley+corner.

2 weeks ago, my good friend Savannah came over and helped me paint the back wall.  It was dirty, chipped, and had random splotches of pink.  I picked out a cute beige-tan color at Home Depot the day before, called "weathered sandstone", and we got to work!  Jeff watched Caitlin while S and I got to work; she made sure I didn't half ass the task (grr!).
Our 2 hours of hard work paid off.  The wall looks terrific!
Here is the before and after.  (by the way, the paint color ended up coming out WAY lighter than on the color swatch.  liars!!).
who knew a fresh coat of paint makes a world of difference.
we didn't even repaint the red trimming.  It just looks so much bolder contrasted against the clean coat of beige paint


Next is the creepy corner of my backyard.
There already is a filthy alley there, that we covered up with 2 succulent shrubs a few months back.  But the wall adjacent to the alley needs a lot of TLC.  The wall has paint (but it doesn't look like paint.  It looks like someone previous painted a layer of plaster on the wall) that is peeling away and falling off towards the bottom.   To fix it would require scraping the layer of plaster off, sanding the wall, then putting on some new coats of paint.  It's really a lot of work.  Not to mention, this "wall" in the back of my yard is actually the side of my neighbor's house. WTF! Only in LA do houses not come with real partitions.  To put in so much work would require the approval of my neighbor, and I also feel like I shouldn't be fixing my neighbor's house unless I'm getting paid for it!
So, we did the quick easy solution:  add even more succulent shrubs to cover the wall!!  We purchased 3 pots of firestick succulents this weekend and moved some of my succulent containers (from my container garden) to the wall as well.
I think this area of my yard looks a lot better.  
ooh, that new paint job on the right looks fantastic


All the work on my backyard is completed just in time for us to host Caitlin's 2nd birthday party in March!  (We are getting a bouncy castle in our backyard!)  It's a great excuse to show off our new yard to our friends and neighbors too =)

Thursday, December 19, 2013

Our backyard - patio edition

To refresh your memory, back in July, we cleared our backyard of 7 foot tall weeds.  Then in September, we installed artificial grass in our yard and added mulch to the perimeter of the backyard.
The last and final touches we need in our backyard are a patio area and garden!
In November, we got to work searching for an outdoor patio dining set and started working on a garden.

For the garden, I can't plant anything into the ground since the ground is covered with artificial grass.  As a result, I went the "container gardening" route, which is very hip among city and apartment dwellers!  I don't have a green thumb so cutesy, delicate, flowers were out.  Succulents are plants that are very hardy and independent. A succulent garden is perfect for me because I would have to be incredibly inept to kill succulents!  For containers, I collected flower pots from family and friends, dug out old unused tupperware from the kitchen and also purchased a few flower pots from Home Depot.  Then during my daily walks around the neighborhood, I took succulent clippings from other people's yards and walkways and planted the clippings into my flower pots.  Now, I can brag to others that "my succulent garden consists of succulents from all over Los Angeles!".
My succulent container garden. All the succulents are still babies.
Can't wait to see how big they get in the next few months.


I also purchased 2 used wicker chairs for $5 (what a steal! I bought it from the "Westside Swap" group on Facebook) that I placed adjacent to the succulents, so people can sit, chat, and enjoy the view of my container garden.


For the patio dining set, we spent a long time deciding what kind of patio set we wanted. I've always liked the "sling" look on patio chairs but they tend to be more expensive and have to be "re-slung" every few years.  I didn't want to spend more than $600 on a quality outdoor dining set but at that budget, our options were close to none.  We looked on Craigslist for used options but many were still higher than $600 and we don't own a truck to pick up the dining set.  Sure, we could go through the effort of renting a Uhaul then coordinating a time with the seller, but the logisitics would be too difficult.  It was just easier to pay for something brand new that could be delivered to us.
Good ol' IKEA always pulls through!! 
Through a blog post about quality budget patio sets, I discovered that IKEA sells a 6-seater, solid wood, outdoor dining set (The Applaro) for only $400!  After reading some reviews about the Applaro, all the reviews were very positive: comfortable, durable, kind to the eyes, and affordable. I think we paid an additional $100 for delivery, which was still well below our budget. 
A 6 seater, with an extra flap you can extend to make the table longer

Caitlin was an integral part of the Applaro building process


We invited some friends over to BBQ in our yard and try out the new patio table.  Everything was great except one thing:  it got really cold in the evening and we eventually had to move the party indoors.  We casually eyed some patio heaters but they all seemed too expensive, and I was unsure how often I would even use the patio heater.  The cheapest one we found was a $130 heater at Home Depot.  Then cyber Monday came along (the Monday after Thanksgiving) and got an email from Home Depot: outdoor patio heater, originally $130, is now $99!  I had Jeff immediately place an order and he picked up the patio heater that evening.  Jeff even found a $5 off coupon at RetailMeNot, dropping the price to $94! 
We are currently in the process of trying to figure out how to power the stupid thing (sure, it takes propane but how do you get the tank to fit in the base of the heater?).

Caitlin helping Jeff assemble the patio heater


Last thing we needed was a kids picnic table for all the times that we have little kiddos over at our house, or for when Caitlin wants to dine al fresco!  Kid picnic tables run at about $70 on Amazon, which is pretty steep. I put one on Caitlin's Amazon Wishlist, hoping some generous person , that loves Caitlin very much,  would buy one for her.  But as it turned out, we didn't need to! 
During one of our daily walks around the neighborhood, I saw that the local daycare threw out an old picnic table on the street!  I texted the lady that runs the daycare and asked "I see you put a kids picnic table on the sidewalk.  Do you no longer want it? If not, can I have it?".  She said I could have it! Yay!!  After struggling to drag the picnic table home one-handed, while carrying Caitlin in my other arm, the lady said she would hang onto the picnic table for me until Jeff can come over and get it.  How sweet her.  Later that night, I sent Jeff over to pick up the picnic table and voila! We were the proud owner of a new old picnic table!  Everything worked out so perfectly.

the kids picnic table with 2 additional plastic chairs added on the sides.
The Applaro in the background


In the back of our yard, we have a creepy alley behind our garage.  It's filthy and not very safe back there.  To draw one's attention away from this alley, we purchased 2 succulent shrubs from C&S Nursery to hide the entrance of the alley.
The entrance to the alley on the lower-left frame.
Top photo and bottom-right photo shows how it looks now with our new shrubs!
Alley?  What Alley?

The ultimate goal is to have a container garden along the entire back wall as well.  But the plants would need to be shade plants since that area gets very little sun.


What do you think of our backyard now?
It took a long time getting here (oh, about 4.5 years), but we finally have a usable backyard that we aren't ashamed to show people, and we aren't afraid that snakes would come haul Caitlin away!

Happy Holidays 2013!

As we are wrapping up the whirlwind year of 2013 (where I still think it's January 2013), I want to wish everyone a very happy holidays full of laughter, love, and warm fuzzies.

Let's hope 2014 treats us equally well as 2013, if not better!

Monday, November 25, 2013

Rubbles!

A few days before my birthday, I discovered Ruby in the evening, laying lifeless in her cage, at an odd angle.  I suspected that she had passed away but I was too nervous to get close to the cage to check for sure.  As Caitlin ate dinner, I kept an eye on the cage from afar to see if there was any movement.  After half an hour of Ruby laying in that same position, I was pretty confident that Ruby had suspiciously and suddenly passed away.
I didn't want to get a replacement piggy but we had to because guinea pigs must live in pairs to avoid loneliness and depression.  We didn't have time to go adopt a new piggy for Marbles that upcoming weekend because it was my birthday weekend and our calendar was booked (why must guinea pig rescues be so far away? The closest one is in Chatsworth, the next closest one is in Anaheim. It's almost as if these rescues *want* me to go to the Petco 2 blocks away and buy a piggie).

We booked an adoption appointment with LA Guinea Pig rescue 2.5 weeks away.  I was really nervous that Marbles wouldn't last that long and would die of loneliness.  Luckily, a week before our appointment, I got a call from the woman that runs the rescue, saying she had an opening the following day so I took that time slot in a heartbeat.  The sooner we get Marbles a friend, the better.

The next day, we drove to Chatsworth, which really is really out in the boonies.  The rescue is located at the personal home of the person that runs the rescue, and I am not lying, we had to take a dirt path to get to her home (I really thought we were lost), which turned out to actually be a farm.  I mean, we were greeted by a crazy, noisy goose!  There were also other animals on the property like chickens and horses.  I can't believe Chatsworth is technically located in "Los Angeles County" and the lady running the rescue has the nerve to call her rescue "LA Guinea Pig Rescue".  More like "Middle of nowhere guinea pig rescue".

The lady took us to her garage, which housed at least, 30 guinea pigs, all orphans, hoping to find their forever home.  We took a look at all the females and neutered boys and I picked a female piggy at random.  I just wanted a piggy that got along with Marbles, had short fur (low maintenance), and looked relatively young. The first piggy I picked, named Ivy, was a tan and black short haired piggy, estimated to be 7-8 months old.  We put Ivy and Marbles together in a cage to see if they got along, and it was a match made in heaven -- lots of squeaks, sniffing, and snuggling.
I was able to snap this photo during their bonding process:

Everything looked good, so I signed the adoption form, paid the $35 adoption fee, and we drove back to civilization.

We spent 2 days thinking of a new name for Ivy.  Both Marbles and Ruby were named after stones, so we wanted Ivy to be named after a stone too. We tried to think of stones/rocks that were tan and black in color.  Sandstone... Tigereye (some people call it Tigerstone)... Nothing really rolled off the tongue.  Then Jeff thought of Rubble or Pebble (I thought of Flintstones when I heard these names).  While I thought "Pebble" was a much cuter name, pebbles are gray in color, while rubble is a more tan or brown color.  So we decided on Rubble, and we added an "S" to the end, the same way to added an "S" to the end of Marbles' name.  So there we have it: Rubbles.  It wasn't until I told my sister that I realized that Rubbles sounds a lot like Ruby and Marbles put together.  Oh well, maybe we can pretend it was intentional.

Rubbles is still settling in, so it's been difficult to take any photos of her.  We've had her for over a week now, and still, the only picture I have of her, is the one above.

Friday, November 8, 2013

Our backyard - update

As you may recall from our 7 foot tall weeds post, our backyard was literally (yes, I mean literally, not "literally" when people mean to say "figuratively") was consumed by 7 foot tall weeds.  After we cleared out the weeds and considered all our options, we went with getting artificial grass so we wouldn't have to worry about maintenance and watering costs.

On Sept 19, the folks from Hunny Do Grass came over and installed the grass.  They tore out the old stubby weeds, which were rooted deep in the ground, pulled out some old plumbing that was previously used for an illegal back-house, leveled out the land, then installed the artificial grass.  The folks weren't your typical "Home Depot" laborers.  Instead, these guys were polite, friendly, professional, and best of all, they spoke English!
Putting in artificial grass is basically like installing carpet.  They cut the exact amount that you need for your area, they nail it in, and you upkeep it by occasionally hosing the dust off and using a leaf blower to blow any leaves away.  I did not like how the edge of the "grass" area isn't in a complete straight line (instead, they cut the edge all jagged) because the tiles in the concrete area of our yard aren't aligned. If our yard wasn't previously consumed by weeds, I would have seen that the tiles weren't straight and I would have fixed it myself. So that's a bummer.
But other than that, I'm very happy with the results.  You gotta admit, our backyard looks 200% better than before and is actually usable.

Now all that was left in our yard that was still weedy was the palm tree area.  We decided that mulching the area would look so much nicer, rather than having dead weeds that we would have to cut every couple of weeks.  Mulching also naturally prevents weeds from growing, which means, less work for us!
I got the project started (I was way more enthusiastic than Jeff about mulching) by hosing down the weeds and dirt around the palm trees, to soften that hard, dead, weedy earth.  It was disgusting how many spiders, ants, and grasshoppers emerged from that area running for cover, as I flooded their home. It was pretty gross.  Then I attacked the land with a giant shovel, breaking up the weeds and dirt, then raking the weeds away into a trash can (the entire project was proven to be very difficult with a 1.5 toddler running around getting in my way)  Even after discarding a lot of weeds, there were still so many weeds that were embedded so deep within the hard earth.  Not sure what to do next, I put the project on hold for about 3 weeks.  Within those 3 weeks, we got a lot of rain, then we had a major heat wave.  What ended up happening was, the rain softened the dirt, then dried out all the weeds into light, thin, hay.  We hired our gardener to do an initial cleanup of our backyard, to clean up all leaves that built up in the yard over the last 3 years (yeah, we don't do a lot of yard work, if you can't tell) and cut the weeds that grow through the cracks of our concrete.  Our gardener was so kind to also weed-whack the hay/weeds in the palm tree area!  With most of the weeds gone, Jeff and I were able to easily start mulching the area!  First, we spent an entire day shoveling the land, leveling the land, and discarding any leftover weeds and rocks.  Then I made a trip to Home Depot with my sister and bought some red mulch (I bought a mix of both rubber and wood).  Pouring the mulch was EASY.  Just pour and you're done!

I bet you're waiting for the before and after photos!

Yard, BEFORE artificial grass install

Yard AFTER artificial grass install (caitlin makes a cameo)


Palm Tree area, BEFORE mulching

Palm Tree area, AFTER mulching


Grass Install Progress Photos:


What are we working on now?
We are furnishing the yard with a patio set for adults (estimated to arrive this weekend) and a kids bench for kids (we found a beat up, but usable one on the streets).  I am also working on a succulent container garden to add some actual live plants in the yard.  Will post photo soon!

Doesn't our backyard look so awesome?

Monday, August 26, 2013

7-foot tall weeds

Ever since spring 2013 started, the grass in our backyard slowly transitioned to weeds and began taking over the entire back yard.  With every sunny day and occasional rainfall, the weeds quickly shot up and over the course of a few months, turned into 7 foot weeds!
Now, it wasn't a few whispy tall weeds here and there.  No, it was a dense, thick, jungle full of different types of weeds, tumbling and intertwining each other, with thick stems and roots going down deep into the soil. Not to mention, the dense weeds were the home of a ton of spiders and grasshoppers.

Yao was so nice to visit us from SF to spend July 4th with us this year (starting to seem like an annual tradition!) and help us with our weeds.
Jeff and I thought over a gameplan for how to tackle the weeds.  Jeff suggested simply attacking the jungle with a lawn mower, but I thought that would simply knock the weeds over sideways but wouldn't actually cut and kill the weeds.  We thought of other options like weed whackers and garden shears but that would be too labor intensive.  We needed something that is fast and efficient.  We read some internet forums about weed removal and someone suggested using a scythe, which is very effective but requires a lot of skill.  Then I thought about how one would penetrate a jungle, like if we were hiking through the amazon rainforest...... I got it!!  a MACHETE!!
Where in the world would we even get a machete from?

A quick search on the Home Depot website yielded a $15 machete so we hopped in the car to the local Home Depot and purchased our very own machete.
The boys got to work the following day (I intended on helping after I fed Caitlin lunch and put her down for her nap but apparently the boys finished before I was done!) and found that the machete was so efficient and perfect for the task.

7 foot tall weeds!

maybe the weeds were closer to 7.5 feet tall

ready for action!

We weren't exaggerating. It was a tumbling mess.  The weeds consumed my veggie garden!

Weeds are noticably shorter. Good job Yao!

oh good. I can actually see the back of the yard now.

once the weeds were short and manageable, the boys mowed and snipped

trash pile

exhausted

a job well done!

They finished the entire job in about 1.5 hours.  There was more weeds than we couple dispose of in our trash cans so it took us about 3 weeks to finally get all the weeds hauled away by the trash company. 

Now what. 
We have an entire yard full of prickly dead weeds that easily pierces through the skin.  Not safe to wear sandals in our yard and definitely not safe for Caitlin to be running through!  We also don't want to put in brand new sod because the upkeep and maintenance of grass is ridiculous (what a waste of water and money towards a gardener).  We considered options like drought tolerant plants like dymonidia, but we didnt want to hire a landscaper to flatten the ground, remove the pipes, prepare the soil, and plant the plants.  And dymondia still needs the occasional watering.  After several weeks of going back and forth on ideas, we finally decided that installing artificial turf would be the best option for us.  Requires no water, no mowing, and lasts up to 20 years.
I found that Costco sold artificial turf on their website at a great price (under $3 per sq foot) but turned out, the contracted company that Costco worked with (Pregra) were incredibly unprofessional (stood us up on 2 scheduled appointments) and their turf installation prices weren't competitive.
After looking on Yelp, we decided to get an estimate with Hunny Do Grass since they had raving Yelp reviews.  The sales guy came over, right on time, measured our lot, and gave us an estimate right then and there.  The price came out to a grand total of $4735 ($1K cheaper than the quote from Pregra) for the turf + weed and pipe removal + turf installation for our backyard, with a 10 year warranty.  We signed the contract today and we scheduled the turf installation for Sept 19.  Can't wait!  They are so popular since their install guys are booked for weeks.  With Pregra, the install guys were available for install within 2-3 days... guess that shows that nobody wants to work with them!

Will update you all when the turf is in!

Saturday, July 13, 2013

NJ trip - June 21-Jul 1, 2013

We recently returned from a trip visiting family in NJ.  We arrived in NJ super duper late on June 21 (Caitlin didn't go to bed until past 1am EST), and we caught the first flight back home on July 1st at 6am EST (which meant we were up at 3am EST, which is midnight PST!).
We had quite the whirlwind week, where we squeezed in 2 parties and tried to fit in as much family time as we could in between Caitlin's rigid schedule.
Even though we didn't do any sight seeing in New Jersey, I actually preferred it that way.  You can't get to any hotspot destinations in NJ without driving at least 1 hour one-way, and since Caitlin hates car rides and has a limited schedule, I was much happier just hanging out at home. =)   Traveling with a baby makes mama work double-time (Caitlin was super fussy and getting her to sleep was tough), so I was extra tired.  No way I had energy to sight see!  We also discovered that one of Caitlin's favorite activities is playing with a hose in the yard, so when we arrived back in LA, one of the first things we did was order a hose!

Here is a sample of some of the pictures from NJ,
From Somerset, NJ - June 2013

From Somerset, NJ - June 2013

View the rest of the album here:
Somerset, NJ - June 2013


One of the highlights of this trip, was that Caitlin and I got to see fireflies for the first time.  If you didn't know, fireflies do not exist west of the Appalachian mountains, which is why you never see them in CA. Here if a vid of us chasing fireflies:


Oh, and if you were wondering how the flight there and back went, I would say the flight there was tough.
On the flight to NJ, we flew during Caitlin's scheduled nap time.  But instead of napping her usual 1-2 hours, she napped a whopping 20 minutes!!  We spent the remainder of the 5 hour flight trying so hard to entertain her, show her cartoons on the laptop, feed her snacks, give her OJ to drink, let her play with plastic cups and ice.... you name it.  And every time she cried (which was frequent), I would nurse her.  I got to the point where I whipped out my boob so much that I didn't care who saw my boobs, as long as it kept Caitlin quiet. Having the option to nurse her to shut her up was so nice.  Once Caitlin is weaned, flying/traveling will be incredibly hard.

The flight back was GREAT.
We were the last to board the flight and we noticed that the entire row in front of us was empty!  They must have missed their flight since we were the last to board and it was a completely booked flight. Quick-thinking Jeff immediately hopped into the empty row and claimed the seats.  It was so nice to have all 3 seats for the 3 of us (having a lap baby is HARD when having to squeeze into only 2 seats).  Caitlin loved the freedom to roam across the seat, look out the window, stare at people down the aisle... Caitlin barely cried during the flight.  Also, Caitlin napped for an hour on the flight since we were up since 3am that morning, so that was nice too.  We finally arrived back at LAX at 8am, and it felt like we already spent an entire day awake, but the day was just starting!  As we were leaving the plane, several passengers on the plane stopped to tell us how behaved Caitlin was, and that they didn't even know we had a baby during the flight!  One lady even stopped us in the terminal to compliment how well-behaved Caitlin was.
I couldn't be prouder of Caitlin.